
Learn about admission webhooks in Kubernetes and why you might want to write your own.
Intro
If you want to jump to my project directly, you can find it here.
I recently switched from Calico to Istio as my main networking solution for Kubernetes. Because I now use AuthorizationPolicies instead of NetworkPolicies to control traffic between my pods (which allows you to control traffic by identity and by DNS names), I needed to find a way to prevent myself from creating NetworkPolicies inside those clusters. I did not want to accidentally create a NetworkPolicy that would cause a whole namespace’s traffic to be blocked.
Kubernetes is a great tool to manage your containerized workloads. It provides a lot of features out of the box, but sometimes you need to extend it to your needs. This is where admission webhooks come into play.
What Are Admission Webhooks?
Admission webhooks are a way to extend the Kubernetes API server with your own logic. They are called admission webhooks because they are called by the API server when a request is made to the API server. The API server then calls your webhook and asks for a response. The webhook can then decide whether the request is allowed or not.
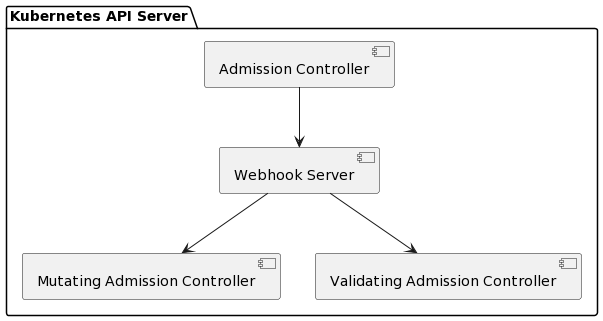
There are two types of admission webhooks: validating admission webhooks and mutating admission webhooks. Validating admission webhooks are called before the request is processed by the API server. They can be used to validate the request and reject it if it is invalid. Mutating admission webhooks are called after the request is processed by the API server. They can be used to modify the request before it is processed by the API server.
Writing My First Admission Webhook
I started writing my validating admission webhook from scratch. I wrote it in Go to get some practice. The only thing I knew about admission webhooks was that I needed to read a validation request - and for my use case, deny it if it was a NetworkPolicy request. Because that was all I needed, I relied on net/http (spoiler: This is enough!) and wrote a simple HTTP server which effectively denies all requests with a 4xx HTTP status code.
For debugging, I started a Minikube Kubernetes cluster locally, put my freshly Golang binary into a container image and loaded it with minikube load. I then created a ValidatingWebhookConfiguration to register my webhook with the API server. I then created a NetworkPolicy to test my webhook. I was able to see the requests coming in and my webhook denying them.
However, Kubernetes was not really happy about that. It said that my webhook was failing to create a TLS connection. I was confused because I did not configure TLS at all. I then found out that the API server requires TLS for admission webhooks (it even allows you to bring your own certificate chain, which is what I ended up doing using Helms templating engine).
The next thing I ran into was that the API server does not want a 4xx HTTP status code. It wants a 200 HTTP status code with a JSON body containing the result of the validation. I was able to fix that by using the admission package from the Kubernetes Go client. This package provides a AdmissionReview struct that can be used to return the result of the validation. That’s not really intuitive, but when you know it, it’s easy to fix.
Security Considerations
I do not recommend using self-signed certificates for security-related webhooks. Since my use case was not security-related, I did not care about that. However, if you want to use your webhook in production, you should use a certificate signed by a trusted CA and use cert-manager to spin things up.
Refactoring
Note: If you’re just interested in admission webhooks, you can skip this section.
I quickly realized that my code base (despite being quite small in total) was not going to be maintainable or testable in the long run. Recently, I read about tidying code up and refactoring it. I decided to give it a try and started refactoring my code.
First, I extracted functionality like net/http handlers into their own functions. Also, caring about constructing an admission response was not really my concern. I extracted that into its own function as well. I also extracted the validation logic into its own function. This way, I was able to test my validation logic without having to spin up a whole HTTP server.
Since I wanted every function to log its errors and information, I also extracted the logging logic into its own function. This way, I was able to log in a consistent way and without creating a new logger for every piece of code.
Last but not least, I extracted the functions by their responsibility into their own packages. This way, I was able to test them in isolation and make sure that they work as expected.
This was a quick write up by me, a quick read for you, but this took me quite some time. I learnt a lot about refactoring and had to look a lot of things up about Go, which was exactly what I wanted to achieve. I am now able to write better code and I am able to test my code in isolation.
Conclusion
Admission webhooks are a great way to extend the Kubernetes API server with your own logic. It was fun to write my own admission webhook and I learnt a lot about Go, the Kubernetes API (and docs!) and refactoring. I hope that this article was helpful to you and that you learnt something new about admission webhooks.
Whenever I did some greater changes on the code base, I pushed a new version to my GitHub repository. You can compare those here.
Also, for simpler use cases, you might use the repository as a template for your own admission webhook.